Markdown Blog with Next.js, Typescript and Tailwind
This article will discuss how to create a markdown based blog using next.js, typescript and tailwind. This will be a static website, with all the blog posts generated from the markdown files during the build time. We will also look at rendering code blocks with syntax highlighting.
Initialize Project
Create new next.js project with typescript using the following command.
npx create-next-app —-typescript
Tailwind Setup
- Install
tailwinddevelopment dependencies usingnpm install -D tailwindcss@latest postcss@latest autoprefixer@latest - Use
npx tailwindcss init -pcommand to generate tailwind configuration filestailwind.config.jsandpostcss.config.js - Since
tailwindis a utility first library, by default, it comes with a lot of utility css classes and not all of them are used in our app. Let’s use thepurgecommand to tree-shake and remove any unused styles from the production builds. Intailwind.config.jsupdate thepurge: []topurge: ['./pages/**/*.{js,ts,jsx,tsx}', './components/**/*.{js,ts,jsx,tsx}'].
// tailwind.config.js
module.exports = {
  purge: ['./pages/**/*.{js,ts,jsx,tsx}', './components/**/*.{js,ts,jsx,tsx}'],
  darkMode: false,
  theme: {
    extend: {},
  },
  variants: {
    extend: {},
  },
  plugins: [],
};- Import
tailwindinto the project by addingbase,componentsandutilitiesstyles to theglobals.cssfile generated bynext.js
/* ./styles/globals.css */

@tailwind base;
@tailwind components;
@tailwind utilities;
Create Blog Posts Using Markdown
Let’s create few sample blog posts using markdown for our blog. Create a folder called data and inside that create another folder posts. The posts folder will contain all the markdown files for the blog posts.
Sample blog post hello-world.md
---
title: Hello World
description: First Markdown Based Blog Post
updatedAt: 2021-08-22
author: Bojack Horseman
---
# Hello World
## Testing
lorem ipsum....
### this is a heading 3
#### heading 4 is this
##### heading five ooooo
###### this is heading six
Random paragraph text. This is a sample markdown blog posts!!
```html
<p>dhdhfdh dhfdhf</p>
```
```js
function test(a) {
console.log('this is a JS code');
}
```
```ruby
def test
puts('ruby is coool!!!!')
end
```
Apart from the regular markdown syntax and the content for the blog, hello-world.md file has some metadata related to the blog posts. These metadata are also referred to as the front-matter and they are defined in the markdown files inside the --- block. front-matter will contain any additional information associated with the blog post.
---
title: Hello World
description: First Markdown Based Blog Post
updatedAt: 2021-08-22
author: Bojack Horseman
---Defining Models
Let’s define few data model that defines the blog post. Let’s create a models folder and create couple of files post.ts and frontmatter.ts. Post and Frontmatter types collectively define the attributes of a markdown blog post.
// models/post.ts

import Frontmatter from './frontmatter';

interface Post {
  slug: string;
  content: string;
  frontmatter: Frontmatter;
}

export default Post;
// models/frontmatter.ts
interface Frontmatter {
title: string;
description: string;
author?: string;
updatedAt?: string;
createdAt?: string;
}
export default Frontmatter;Create the Index Page
Inside pages folder create a index.tsx file. The index page will parse all the markdown files from the data/posts folder and render a list of posts title and description.
In Next.js, we can use getStaticProps to write backend code that runs on the server. Any code inside the getStaticProps will run on the server and is executed during the build time. We will use getStaticProps to read the markdown files from the file system and extract the metadata and the markdown content of the blog posts. getStaticProps will return an object which is passed as props to the Home component.
We will use the fs module from node.js to read the markdown files from the files system. Additionally, a package called gray-matter is used to extract the metadata object after parsing the markdown file.
Install gray-matter as development dependency.
npm i --save-dev gray-matter
Get all the files from data/posts directory.
const files = fs.readdirSync(`${process.cwd()}/data/posts`);Loop through each files and parse each file to string. Now, we can use the matter function from the gray-matter package to retrieve the frontmatter (metadata) and the actual markdown content of the file.
const file = fs.readFileSync(`data/posts/${fileName}`).toString();

// matter returns an object containing data and content keys
// data will have the frontmatter
// and content will have the actual markdown content
const { data, content } = matter(file);
For each file, create post object using the frontmatter and content returned by the matter function call. We will use the file name as a slug. Finally, getStaticProps will return an Array of Post object which will be passed as props to the Home component.
// pages/index.tsx

import fs from 'fs';
import matter from 'gray-matter';

export async function getStaticProps() {
  const files = fs.readdirSync(`${process.cwd()}/data/posts`);

  const posts: Array<Post> = files.map((fileName) => {
    const file = fs.readFileSync(`data/posts/${fileName}`).toString();

    const { data, content } = matter(file);
    const frontmatter = { title: data.title, description: data.description };

    return {
      slug: fileName.replace('.md', ''),
      content: content,
      frontmatter,
    };
  });

  return {
    props: {
      posts,
    },
  };
}
Create and export a Home component on the index page. The Home component will receive an array of Post and render a list of post title and description.
// pages/index.tsx

import Link from 'next/link';

type HomeProps = {
  posts: Array<Post>;
};

const Home: NextPage<HomeProps> = ({ posts }: HomeProps) => {
  return (
    <div>
      <main className="container mx-auto py-8 px-4 md:px-0 flex flex-col">
        <h2 className="text-6xl text-bold font-serif text-yellow-800">
          Sloth Blog
        </h2>
        <div className="my-6 flex-col">
          {posts.map((post, idx) => {
            return (
              <Link href={`/posts/${post.slug}`} key={idx} passHref={true}>
                <div className="w-max py-2">
                  <h3 className="text-2xl text-bold font-sans">
                    {post.frontmatter.title}
                  </h3>
                  <p className="text-sm font-thin">
                    {post.frontmatter.description}
                  </p>
                </div>
              </Link>
            );
          })}
        </div>
      </main>
    </div>
  );
};

export default Home;
With the magic of tailwind utility classes and a simple markup, we have a basic looking index page for our blog. Notice that we have used the Link component provided by next.js. Link component acts as an anchor tag and accepts an href prop. We use the slug to identify each blog post and will redirect to blog post URL /posts/{slug}.

Create Post Page
When clicked on one of the blog posts in the index page, it redirects to the posts page to read the post content. However, we haven’t created the post page yet. Let’s create a [slug].tsx file inside pages/posts directory.
We will use dynamic route feature of Next.js to dynamically generate the posts pages. For each markdown file in data/posts folder, we want to tell Next.js to generate individual pages during the build time. If we have 100 markdown files in our blog, Next.js will statically generate 100 html pages during build time.
getStaticPaths function allows us to create dynamic routes based on the parameters passed in, which in our case is the slug. In getStaticPaths it reads all the files in data/posts directory and return an array of objects. Each object must have the params key and contain an object with the slug key since we are using [slug] in the file name. After creating a dynamic routes, getStaticPaths passes the current slug received as a query param to the getStaticProps method.
// pages/posts/[slug].tsx
import fs from 'fs';

export async function getStaticPaths() {
  const files = fs.readdirSync(`${process.cwd()}/data/posts`);

  const paths = files.map((fileName) => {
    return {
      params: {
        slug: fileName.replace('.md', ''),
      },
    };
  });

  return {
    paths,
    fallback: false,
  };
}
getStaticProps receives the params.slug from getStaticPath . getStaticProps makes use of the slug params to parse the markdown down and pass the frontmatter and markdown content to the PostPage component.
// pages/posts/[slug].tsx

import fs from 'fs';
import matter from 'gray-matter';

export async function getStaticProps({
  params: { slug },
}: {
  params: { slug: string };
}) {
  const file = fs.readFileSync(`data/posts/${slug}.md`).toString();
  const { data, content } = matter(file);

  return {
    props: {
      slug,
      content,
      frontmatter: { title: data.title, description: data.description },
    },
  };
}
Next step is to create the PostPage component that renders the blog post. PostPage component would receive a Post object as props from the getStaticProps method.
// pages/posts/[slug].tsx
const PostPage: NextPage<Post> = ({ slug, content, frontmatter }: Post) => {
return (
<main className="container mx-auto px-3 py-4 md:px-0">
<article>
<p>{content}</p>
</article>
</main>
);
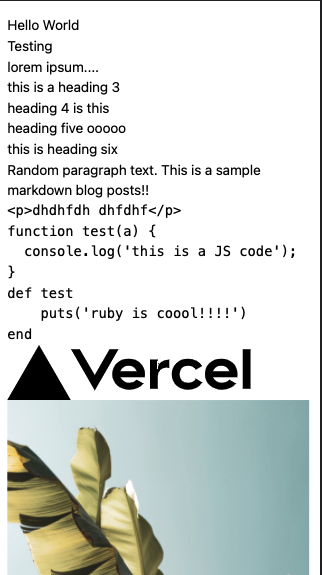
};The above PostPage component renders the markdown content as a plain text. At this point our page looks like below, entire markdown content rendered as a plain text.
Render Markdown as HTML
We want to convert the markdown content raw string to corresponding HTML tags and render the markdown as an HTML. For this we will use a package called React Markdown.
Install react-markdown package using npm i react-markdown
In PostPage component, let’s wrap the markdown content with the ReactMarkdown component. ReactMarkdown accepts the markdown content as a children and it renders the markdown as an HTML.
// pages/posts/[slug].tsx

import ReactMarkdown from 'react-markdown';

const PostPage: NextPage<Post> = ({ slug, content, frontmatter }: Post) => {
  return (
    <main className="container mx-auto px-3 py-4 md:px-0">
      <article>
        <ReactMarkdown>{content}</ReactMarkdown>
      </article>
    </main>
  );
};
Now the post page will render the markdown content as HTML.
Styling the markdown content using tailwind typography
Now that the markdown content is rendered as HTML, it’s time to make it look good. However, we don’t want to define CSS styles on each of the markdown files. By default, tailwind CSS resets all the browsers default styles on all DOM elements, so default styles for headings, paragraphs and anchor tags are not yet defined.
Tailwind provides a typography plugin to apply sensible defaults to our HTML content rendered from Markdown.
Install tailwind typography plugin using npm install @tailwindcss/typography and add it to the plugins array in tailwind.config.js e.g.
plugins: [require('@tailwindcss/typography')]
Next step is to add prose class to the html tag wrapping the ReactMarkdown component.
// [slug].tsx
// add prose css class to article tag
const PostPage: NextPage<Post> = ({ slug, content, frontmatter }: Post) => {
return (
<main className="container mx-auto px-3 py-4 md:px-0">
<article className="prose">
<ReactMarkdown>{content}</ReactMarkdown>
</article>
</main>
);
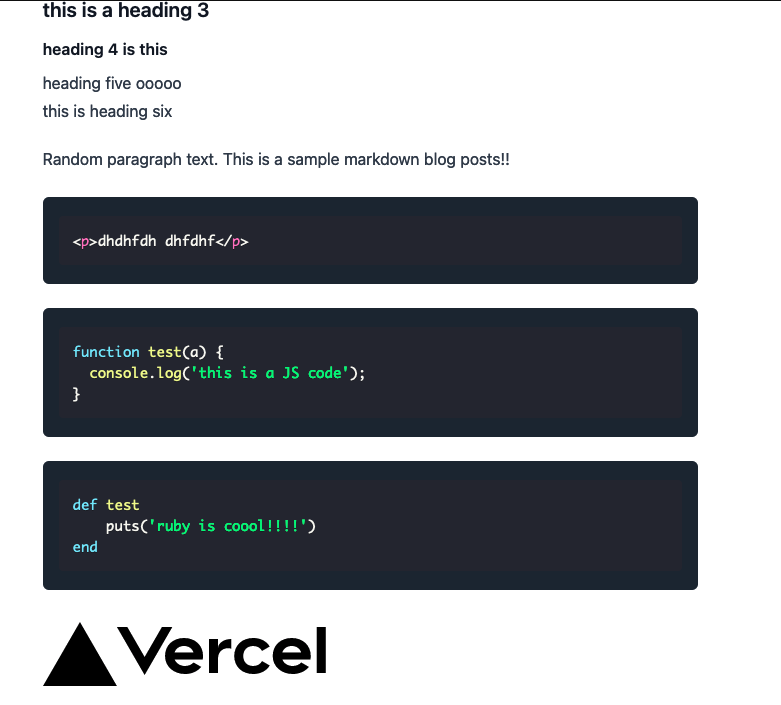
};With the default styles our post page now looks like this.
We can override default styles set by tailwind typography plugin by extending the tailwind theme.
// tailwind.config.js
module.exports = {
  purge: ['./pages//*.{js,ts,jsx,tsx}', './components//*.{js,ts,jsx,tsx}'],
  darkMode: false,
  theme: {
    extend: {
      // override default styles from typography plugin
      typography: (theme) => ({
        DEFAULT: {
          css: {
            h1: {
              color: '#FF5C58',
            },
          },
        },
      }),
    },
  },
  variants: {
    extend: {},
  },
  plugins: [require('@tailwindcss/typography')],
};
Using Syntax Highlighter to highlight codeblocks
Using tailwind typography plugin, our post page have some basic styling. However, it still lacks the syntax highlighting for the code blocks. For this we will use a package called react-syntax-highlighter.
Install react-syntax-highlighter and the it’s corresponding type definitions for Typescript.
npm install react-syntax-highlighter
npm install -D @types/react-syntax-highlighter
In PostPage component, we used ReactMarkdown to convert markdown content to equivalent HTML tags. ReactMarkdown provides a way to overwrite the default handling of any DOM elements by passing a components params. Here, we would overwrite the default handling of code element by passing our custom implementation using the react-syntax-highlighter
// [slug].tsx
import { Prism as SyntaxHighlighter } from 'react-syntax-highlighter';
import {
dark,
dracula,
prism,
} from 'react-syntax-highlighter/dist/cjs/styles/prism';
const PostPage: NextPage<Post> = ({ slug, content, frontmatter }: Post) => {
return (
<main className="container mx-auto px-3 py-4 md:px-0">
<article className="prose">
<ReactMarkdown
components={{
code({ node, inline, className, children, ...props }: any) {
const match = /language-(\w+)/.exec(className || '');
return !inline && match ? (
<SyntaxHighlighter
style={dracula} // try passing different color schemes, drak, dracula etc.
language={match[1]}
PreTag="div"
{...props}
>
{String(children).replace(/\n$/, '')}
</SyntaxHighlighter>
) : (
<code>{children}</code>
);
},
}}
>
{content}
</ReactMarkdown>
</article>
</main>
);
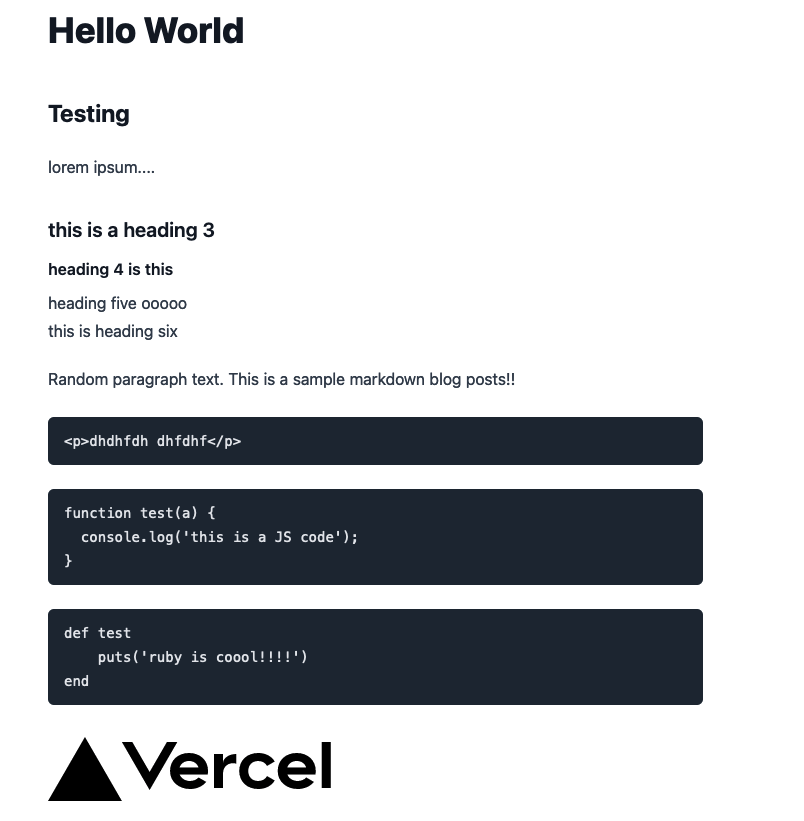
};Our Post Page finally looks like this, with syntax highlighting for the specified language.